 ## Block SQL injections

set $block_sql_injections 0;

if ($query_string ~ "union.*select.*\(") {

set $block_sql_injections 1;

}

if ($query_string ~ "union.*all.*select.*") {

set $block_sql_injections 1;

}

if ($query_string ~ "concat.*\(") {

set $block_sql_injections 1;

}

if ($block_sql_injections = 1) {

return 500;

}
## Block file injections
set $block_file_injections 0;
if ($query_string ~ "[a-zA-Z0-9_]=http://") {
set $block_file_injections 1;
}
if ($query_string ~ "[a-zA-Z0-9_]=(\.\.//?)+") {
set $block_file_injections 1;
}
if ($query_string ~ "[a-zA-Z0-9_]=/([a-z0-9_.]//?)+") {
set $block_file_injections 1;
}
if ($block_file_injections = 1) {
return 500;
}
## Block common exploits
set $block_common_exploits 0;
if ($query_string ~ "(<|%3C).*script.*(>|%3E)") {
set $block_common_exploits 1;
}
if ($query_string ~ "GLOBALS(=|\[|\%[0-9A-Z]{0,2})") {
set $block_common_exploits 1;
}
if ($query_string ~ "_REQUEST(=|\[|\%[0-9A-Z]{0,2})") {
set $block_common_exploits 1;
}
if ($query_string ~ "proc/self/environ") {
set $block_common_exploits 1;
}
if ($query_string ~ "mosConfig_[a-zA-Z_]{1,21}(=|\%3D)") {
set $block_common_exploits 1;
}
if ($query_string ~ "base64_(en|de)code\(.*\)") {
set $block_common_exploits 1;
}
if ($block_common_exploits = 1) {
return 500;
}
## Block spam
set $block_spam 0;
if ($query_string ~ "\b(ultram|unicauca|valium|viagra|vicodin|xanax|ypxaieo)\b") {
set $block_spam 1;
}
if ($query_string ~ "\b(erections|hoodia|huronriveracres|impotence|levitra|libido)\b") {
set $block_spam 1;
}
if ($query_string ~ "\b(ambien|blue\spill|cialis|cocaine|ejaculation|erectile)\b") {
set $block_spam 1;
}
if ($query_string ~ "\b(lipitor|phentermin|pro[sz]ac|sandyauer|tramadol|troyhamby)\b") {
set $block_spam 1;
}
if ($block_spam = 1) {
return 500;
}
## Block user agents
set $block_user_agents 0;
# Don't disable wget if you need it to run cron jobs!
#if ($http_user_agent ~ "Wget") {
# set $block_user_agents 1;
#}
# Disable Akeeba Remote Control 2.5 and earlier
if ($http_user_agent ~ "Indy Library") {
set $block_user_agents 1;
}
# Common bandwidth hoggers and hacking tools.
if ($http_user_agent ~ "libwww-perl") {
set $block_user_agents 1;
}
if ($http_user_agent ~ "GetRight") {
set $block_user_agents 1;
}
if ($http_user_agent ~ "GetWeb!") {
set $block_user_agents 1;
}
if ($http_user_agent ~ "Go!Zilla") {
set $block_user_agents 1;
}
if ($http_user_agent ~ "Download Demon") {
set $block_user_agents 1;
}
if ($http_user_agent ~ "Go-Ahead-Got-It") {
set $block_user_agents 1;
}
if ($http_user_agent ~ "TurnitinBot") {
set $block_user_agents 1;
}
if ($http_user_agent ~ "GrabNet") {
set $block_user_agents 1;
}
if ($block_user_agents = 1) {
return 500;
}
#some bot does not send user-agent, just block them
if ($http_user_agent = "") {
set $proxyflag "forbidden";
return 500;
}
#security for timthumb remote code execution exploit
if ($request_uri ~* "\.php.*src=.*(flickr\.com|picasa\.com|blogger\.com|wordpress\.com|img\.youtube\.com|upload\.wikimedia\.org|photobucket\.com|imgur\.com|imageshack\.us|tinypic\.com)") {
set $proxyflag "forbidden";
return 500;
}
#cached and upload folder should not have any php file
if ($request_uri ~* "/cache/.*\.php") {
set $proxyflag "forbidden";
return 500;
}
if ($request_uri ~* "/uploads?/.*\.php") {
set $proxyflag "forbidden";
return 500;
}
if ($request_uri ~* "/images?/.*\.php") {
set $proxyflag "forbidden";
return 500;
}
#bad behavior url (known botnet/trojan)
if ($request_uri ~* "\?.*eval\(") {
set $proxyflag "forbidden";
return 500;
}
if ($request_body ~* "\?.*eval\(") {
set $proxyflag "forbidden";
return 500;
}
if ($request_body ~* "
26
พ.ย., 2015
ขั้นตอนการติดตั้ง opencart
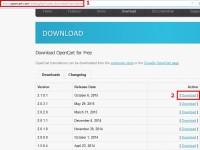
1. การดาวน์โหลดให้ไปที่ http://www.opencart.com/index.php?route=download/download
2.เลือก Download

2. เสร็จแล้วให้ทำการแตกไฟล์ซิปที่ได้มาออก ก็จะได้โฟลเดอร์ชื่อ opencart
ที่มีไฟล์ต่างๆ ที่เราต้องอัพโหลดขึ้นไปยัง Server

อัพโหลดไฟล์ opencartเข้าเว็บไซต์จริงโดยใช้โปรแกรม File Zilla
3.เปิดโปรแกรม File Zilla โดยในช่อง host เราจะได้จากผุ้ให้บริการ Host ที่เราไปเช่ามา
4.ช่อง Username เราจะได้จากผุ้ให้บริการ Host ที่เราไปเช่ามา
5. ช่อง Password เราจะได้จากผุ้ให้บริการ Host ที่เราไปเช่ามา
แล้วเอารายละเอียดพวกนี้มากรอกให้ครบ โดยช่อง port ไม่ต้องใส่แต่ถ้าอยากใส่ก็ใส่ 21 ลงไปนะครับ
6.ไฟล์โปรแกรม opencart ที่เราจะอัพโหลดขึ้นบนโฮสนะครับ
7.อันนี้คือฝั่งโฮสที่เราจะอัพไฟล์ขึ้นไปนะครับ

8.ให้ดับเบิ้ลคลิกที่โฟลเดอร์ opencart ก็จะพบไฟล์ทั้งหมด แล้วก็ลากเมาส์ครอบให้หมดทุกโฟลเดอร์นะครับ คลิกขวาเลือกอัพโหลดไฟล์ขึ้นไปไว้ที่ public_html แต่อย่าลืมเลือกฝั่งขวามือของเราก่อนนะครับ โดยให้ดับเบิ้ลคลิกเข้าไปที่ public_html ก่อน แล้วค่อยเลือกอัพโหลดไฟล์ครับ
9.ไฟล์ที่เราอัพโหลดทั้งหมดก็จะไปโผล่ที่ โฟลเดอร์ public_html

10. เปลี่ยนชื่อไฟล์ Config-dist หลังจากทำการอัพไฟล์ขึ้น Host แล้วต้องเข้าไปเปลี่ยนชื่อไฟล์ 2 ไฟล์ครับ ไฟล์ชื่อ Config-dist.php เปลี่ยนเป็น Config.php ทั้ง2ไฟล์จะอยู่ใน Upload / config-dist.php และ Upload /admin/config-dist.php

สร้างฐานข้อมูล MySQL สำหรับเว็บบอร์ด DirectAdmin
11.คลิก MySQL Management

12.คลิกคำสั่ง Create new Database

13.พิมพ์ข้อมูลลงไปทั้ง 4 ช่อง
14.แล้วคลิก Create

15.หลังจากได้สร้างฐานข้อมูล MySQL เสร็จแล้วก็จะแสดงข้อมูลออกมาในหน้าจอ ให้ก็อปปี้เก็บไว้ เราจะต้องใช้ในการติดตั้งเว็บบอร์ด opencart

15.อย่าลืมทำการ chmod777 เพื่อทำไฟล์/โฟลเดอร์ให้เขียนทับได้ วิธีการคือ
ไฟล์/โฟลเดอร์ที่ต้อง chmod777 คือ
โฟลเดอร์และไฟล์ที่ต้องทำให้เขียนทับได้มีดังนี้
-ไฟล์ config.php
-ไฟล์ config.php อยู่ในโฟลเดอร์ admin
-โฟลเดอร์ cache อยู่ในโฟลเดอร์ system
-โฟลเดอร์ image
-โฟลเดอร์ cache อยู่ในโฟลเดอร์ image
-โฟลเดอร์ data อยู่ในโฟลเดอร์ image
-โฟลเดอร์ download
-โฟลเดอร์ logs ใน Systems

เริ่มการติดตั้งเว็บบอร์ด opencart
17.พิมพ์ URL สำหรับเรียกไฟล์ติดตั้ง เช่น แล้วกด Enter
18.คลิก “Continue”


19.หากไม่มีข้อผิดพลาดอะไรจะเจอะหน้าจอต่อไปนี้ครับ (รูปด้านล่าง) หน้าจอนี้จะแสดงผลการตรวจสอบความพร้อมของระบบและไฟล์ต่าง ๆ ว่าครบถ้วนสมบูรณ์หรือไม่ ถ้าเป็นสีเขียวหมดแสดงว่าพร้อมติดตั้งครับ
20.คลิกปุ่ม Continue ต่อไปได้เลย 
21.ใส่ข้อมูลเพื่อเชื่อมต่อฐานข้อมูลเวิร์ดเพรส โดยพิมพ์ข้อมูลการเข้าใช้งาน MySQL ที่ได้สร้างไว้ในหัวข้อ 15 ที่ได้สร้างไว้
22.กรอกรายละเอียดผู้ดูแลระบบ
23.คลิกปุ่ม Continue ต่อไปได้เลย

24.หน้าจอจะแสดงข้อความเตือนสีแดง ๆ ไม่ต้องตกใจครับเป็นการแจ้งเตือนให้เราลบ Folder install ทิ้งซะเพื่อความปลอดภัย หลังจากนี้ก็สามารถ Login เข้าไปที่ระบบจัดการหลังร้านได้เลยครับ หรือจะไปดูหน้าตาของหน้าร้านออนไลน์ของเรา

25.ลบ Folder install เสร็จเรียบร้อยครับ


